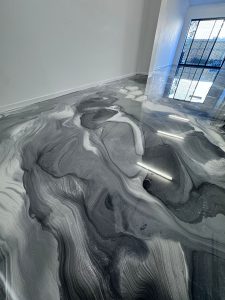
Metallic epoxy flooring looks almost like liquid metal frozen in place—swirling, reflective, and completely unique. But behind that striking visual effect is a surprisingly methodical process built on chemistry, timing, and technique. To really understand why these floors look the way they do (and why no two are ever the same), you need to look at the two core components: epoxy resin and metallic pigments.
Let’s break down how they work together to create that signature 3D effect.
What Is Epoxy Resin?
At its core, epoxy flooring starts with a two-part system:
- Resin
- Hardener
When these two components are mixed, a chemical reaction begins. This reaction transforms the liquid mixture into a solid, durable plastic-like surface. Unlike paint, which simply dries, epoxy cures, meaning it undergoes a molecular change that makes it much stronger and longer-lasting.
This curing process is what gives epoxy floors their:
- High durability
- Resistance to chemicals and stains
- Seamless, non-porous finish
For metallic floors, this resin acts as the clear or tinted base layer where all the visual magic happens.
What Are Metallic Pigments?
Metallic pigments are fine powders made from reflective materials, often mica or similar minerals. These particles are specially designed to:
- Reflect light
- Move within the epoxy before it cures
- Create depth and dimension
Unlike standard color dyes that simply tint a surface, metallic pigments interact dynamically with the epoxy resin. When manipulated correctly, they produce effects that resemble:
- Flowing lava
- Marble veins
- Ocean waves
- Cloud formations
This is why metallic epoxy floors have that signature three-dimensional, almost holographic appearance.
The Science Behind the Swirl Effect
Here’s where things get interesting.
When metallic pigments are added to the epoxy mixture, they don’t just stay still. Because the epoxy remains liquid for a limited time (called the working time), installers can manipulate the pigments before the floor hardens.
During this phase:
- The pigments float and shift within the resin
- Differences in density and viscosity create natural movement
- Tools like rollers, brushes, or even air can guide the flow
As the epoxy begins to cure, these movements are locked in place permanently.
That’s what creates the iconic:
- Swirls
- Ripples
- Layered depth
No two floors ever look identical because the movement is partially controlled and partially organic.
Step-by-Step: How Metallic Epoxy Floors Are Created
Understanding the process makes it easier to see how resin and pigments interact.
1. Surface Preparation
Before anything is applied, the concrete substrate must be:
- Clean
- Dry
- Free of cracks or contaminants
Grinding or shot blasting is typically used to create a rough surface so the epoxy can bond properly.
2. Primer Coat
A primer layer is applied to:
- Seal the concrete
- Improve adhesion
- Prevent air bubbles
This creates a stable foundation for the metallic layer.
3. Base Coat (Optional but Common)
Sometimes a base color is applied underneath the metallic layer. This affects the final look—for example:
- Black base → deeper, more dramatic effect
- White base → brighter, more vibrant finish
4. Metallic Epoxy Application
This is where the resin and pigments come together.
- The epoxy resin and hardener are mixed
- Metallic pigments are added and blended
- The mixture is poured onto the floor
Installers then manipulate the material using:
- Squeegees
- Rollers
- Brushes
- Heat guns or blowers
This step determines the final artistic effect.
5. Self-Leveling Action
One of epoxy’s key properties is that it is self-leveling. This means:
- It spreads evenly across the surface
- It smooths out imperfections
- It helps pigments flow naturally
This contributes to the glass-like finish.
6. Topcoat (Protective Layer)
Once the metallic layer cures, a clear topcoat is applied. This adds:
- Scratch resistance
- UV protection
- Slip resistance (if additives are included)
It also enhances the depth and gloss of the pigments.
Why Metallic Floors Look 3D
The three-dimensional effect comes from a combination of factors:
Light Reflection
Metallic particles reflect light at different angles, creating a shimmering effect.
Layering
Pigments settle at slightly different depths within the epoxy, giving the illusion of layers.
Transparency
The resin allows light to pass through and bounce back, enhancing depth.
Movement Patterns
Swirls and variations trick the eye into seeing motion and dimension.
Together, these elements create a surface that appears to shift and change depending on:
- Lighting conditions
- Viewing angle
- Time of day
Factors That Affect the Final Look
Even with the same materials, results can vary widely. Key factors include:
Installer Technique
The skill and creativity of the installer play a major role.
Pigment Quantity
Too little = subtle effect
Too much = bold, dramatic patterns
Working Time
The longer the epoxy stays workable, the more movement can be created.
Environmental Conditions
Temperature and humidity affect how quickly the epoxy cures and how pigments move.
Why No Two Floors Are the Same
Unlike tiles or pre-fabricated materials, metallic epoxy is created in real time. The combination of:
- Chemical reactions
- Manual manipulation
- Natural pigment movement
means every floor is essentially a one-of-a-kind installation.
Even if you try to replicate a design, small differences in timing, temperature, and technique will produce a different result.
Final Thoughts
Metallic epoxy flooring is where science meets art. The epoxy resin provides the strength, durability, and smooth surface, while metallic pigments bring movement, depth, and visual impact.
What makes these floors stand out isn’t just their durability—it’s the fact that each one is a custom, living design captured at the moment it cures.
If you’re considering metallic epoxy, you’re not just choosing a flooring system—you’re investing in a surface that combines engineering precision with artistic expression.